Welcome to my Blog. Please leave me a comment on any of the cards and let me know what you think. Would love some feedback!!
Wednesday, 13 April 2011
First rubber stamp card
This is my first attempt at rubber stamping. I used clear stamp from Inkadinkado #98843 and Loew Cornell watercolour pencils and added a bow for a little embellishment.
Tuesday, 5 April 2011
Martha Stewart magnet punch design

Used white cardblanks for both. Cut second layer from cardstock slightly smaller than cardblank, then cut next layer slightly smaller than second layer. Used Martha Stewart magnetic punch all over floral tile for the design. These punches are fantastic as you can punch anywhere on the page. They are very easy to line up and the magnets are strong enough to hold completely still while you press the punch down. I added co-ordinating ribbon along the top edge. Starform sticker embellishments finished the card.
50th Anniversary
Used cream card blank and added gold metallic cardstock cut slightly smaller. Cut cream cardstock slightly smaller than the gold. Used Martha Stewart magnetic punch all over floral tile for the design. These punches are fantastic! You can punch anywhere on the page. Various markings on the punch help you to punch where you want. Added sticker greeting and the "50" was cut using the slice Noteworthy design card. Added gold ribbon for a little embellishment.
Happy birthday boy
Used white cardblank and glued on slightly smaller blue cardstock. Cut lettering using Slice design cards "Noteworthy" and "Words and Expressions". Used Cuttlebug cutting templates to cut train designs. The middle car was cut from caboose template.
Friday, 25 March 2011
Daisies in blue
Used white cardblank then cut patterned scrapbook paper slightly smaller. Cut dark blue strip then used Fiskars border punch embosser to cut edge design. Used 3 daisy punches to create varying sized daisies. Added a gem in center for embellishment. Add greeting of your choice to meet your desired occasion.
Simple daisy
Used white cardblank then dark pink cardstock cut slightly smaller. Cut strip of patterned cardstock and added along the side. Used 3 sizes of daisy punches to create daisies x 3 in colours to co-ordinate with background colours. Used a labeller to make wording. This card could be turned sideways and the narrow blue stips I used would then look like flower stems. This card could be used for many occasions. The background pink cardstock could be embossed with Cuttlebug embossing folder. Let your imagination go!! This was created before I had a Cuttlebug.
Easter
Used white cardblank and metallic blue cardstock cut slightly smaller. Embossed with Heritage bundle embossing folder using Cuttlebug then cut out center with largest of the oval Nellie's multi frame MFD 007 designs (purchased from Ecstasy Crafts) using the Cuttlebug. Glued onto cardblank then added an Easter sticker to the center. The outside and corners were embellished with silver starform stickers (Ecstasy Crafts). Any sticker to suit your occasion in the center could change this card completely.
Lace Door cutout
Used white cardblank. Cut pink cardstock slightly smaller and used A2 Plus Embossing Folder (lace door) from Cuttlebug.
Glued onto cardblank then added 3D flower and Happy Birthday sticker. This could be used in various ways, just by changing the colour of cardstock and the 3D accent in the middle. A very simple, quick, yet elegant design.
Thursday, 24 March 2011
Parchment
Used white card blank and multicoloured parchment paper. The parchment was cut using a Nellie's mutiframe die cut using the Cuttlebug. Then embossed and pierced the parchment using a flower pattern. Added Starform stickers along the edge for embellishment.
Fish
Used white card blank and two layers of blue cardstock. The layers were cut with a Nellie's multiframe die using the Cuttlebug then the darker blue frame was embossed with a Cuttlebug embossing frame. Acetate was put behind the cardstock to look like glass. Starform fish stickers were coloured and some were put on the top of the acetate and the negative (remaining sticker pieces) were put directly behind to create 3D effect which doesn't really show in the scan.
Tuesday, 15 March 2011
Butterfly in mauve
White card blank, mauve cardstock with butterflies, mauve cardstock that was embossed with daisy embossing folder. The central butterfly was made from parchment paper, embossed and cut out. The smaller butterflies were punched with Martha Stewart butterfly punch and glued on. The larger butterfly was glued in center only, to create a 3D effect. The card was embellished with Starform stickers.
Parchment butterflies in gold
White card blank. Mapped design on parchment paper with white tinta ink then embossed. The butterflies are 3D although they don't appear to be in this scan. The butterflies were retraced on additional parchment with tinta then embossed and cut out then glued over top to create 3D effect. Gold stickles glue was used in flower centers and for butterfly bodies. The card was embellished with starform stickers. Could be used for many occasions.
Monday, 7 March 2011
Purple baby
Used white card blank. Cut purple cardstock to size of blank then cut with Martha Stewart border punch. Cut light purple cardstock with scalloped square punch. Added starform outfit sticker. Embellished with "baby girl" beads and mauve ribbon.
Baby 3D
Used white card blank then cut pink cardstock slightly smaller than the blank. Embossed with various designs in corners. Added a baby 3D cutout design. Embellished with silver Starform stickers.
Created for son's 21st birthday using cream card blank, burgundy cardstock cut in a strip then embossed with Cuttlebug Iron Works border. Used Cuttlebug metal Vintage Corner die cuts and burgundy cardstock, then outlined with Starform stickers for the designed squares. Used Sizzix happy birthday die cut.
Sunday, 6 March 2011
Copper 3D flower
Used white card blank. Punched copper coloured cardstock with Martha Stewar border punch and added to top and bottom of cardblank. Used 3D punchout flower from Ecstasy Crafts. Add your own greeting to complete.
Brown daisies
White card blank, brown flowered cardstock for sides punched with flower tumble punch. Used mottled scrapbook paper for background behind daisies. Beige cardstock for daisies cut with Martha Stewart pop up daisy punch (2 for each flower). Centers done using brown blending chalks, adding dots of stickles glue in centers. Martha Stewart leaf punch for leaves. Embellished with Starform stickers at the sides of flowered cardstock. Add ribbon then greeting of your choice.
Blue daisies
Cream card blank, blue cardstock for daisies, flower scroll designed scrapbook paper for side strips. Martha Stewart pop up daisy punch (2 for each flower). Martha Stewart leaf punch for leaves. Yellow blending chalk for petals and centers. Yellow stickles glue dotted in centers. Starform stickers for embellishment along side strips. Add greeting of your choice below ribbon.
Black & grey daisy
White card blank, black strips at sides cut from Glitterstack cardstock. Punched with tumble flower punch then dotted with enemal accents in center. Grey mottled background behind daisies. Used Martha Stewart pop-up daisy punch (2 for each flower). Used black blending chalk lightly on petals and more in centers. Put dots of stickles glue in daisy centers. Used Martha Stewart punch for leaves. Added polka dot ribbon tied into a bow. Add greeting of your choice below ribbon to complete.
Saturday, 26 February 2011
Pheasant
This card can be used for male birthday, thinking of you, or even get well. Use a white card blank. Blue and orange patterned scrapbook paper cut slightly smaller than card blank. Orange cardstock cut slightly smaller than scrapbook paper. Emboss orange cardstock with Cuttlebug and florished farm embossing folder. Add pheasant sticker or sticker of your choice. Starform stickers (#1033) were used on the corners and to embellish embossed design.
Merry Christmas Tree
White card blank, green cardstock cut slightly smaller than card blank, red cardstock cut slightly smaller than green. Emboss red with Cuttlebug and twinkle embossing folder (bringing Crafts to You designs). Punch 3 sunburst designs evenly spaced down right side of red. Use starform #859 stickers for Christmas tree and side stickers. Place tree over white cardstock and colour then cut out. Attach stickers with foam tabs for 3-D effect. Add Merry Christmas sticker (starform).
Christmas ornament
Red cardstock cut and folded into card. White cardstock cut slightly smaller than card, followed by green cardstock cut slightly smaller than white. Punch top and bottom of green with snowflake border and embossing punch. Spray glue white and green cardstock to card. Using Marianne design template, emboss and cut out of red cardstock. Embroider with metallic thread and embellish with stickers. Glue to snowflake embossed green cardstock. Add a bow sticker or ribbon tied in bow shape. Add snowflake or sticker of your choice in the middle. Add Merry Christmas sticker (starform).
Merry Christmas Puppy
Use a card blank, then red cardstock cut slightly smaller, then white cardstock cut slightly smaller than red. Cut white with spellbinders eleven template then cut red with next size down spellbinders eleven template. Put sparkling scrapbook paper behind to look like a window. Add starform line stickers to resemble panes (sheet #1016). Add cut out 3D puppy from Moorhead designs. Add starform stickers to edge and snowflake stickers on corners.
Sunday, 20 February 2011
Tools card
Used green cardstock attached to white card. Cut a strip of striped cardstock and spay glued over green cardstock. Punched 2 scalloped squares from red cardstock. Added preprinted tool cutouts from scrapbook calendar.
Green flower spirelli
Used white card then added green strip of cardstock that was punched with flower and embroidered with gold metallic thread. Spray glued to card then added flower stickers over embroidered design. Punched 2 spirelli flowers from green cardstock and wound with one layer of gold metallic thread. Added flower stickers to the center then attached to card. Added starform scroll and message stickers.
Blue card with ducks
Used blue cardstock then cut a smaller white piece of cardstock which was hand embossed and cut out with design template. Cut oval shape in center and added a picture of ducks behind. Spray glued to blue cardstock and added message.
Daisy card
Used light green cardstock for background. Added flower printed cardstock to left side. Punched 3 sizes of daisies in corresponding colours to match flowered cardstock. Printed words with labeller. Added butterfies created with a punch.
Red all occasion with roses
Used red cardstock and printed heart cardstock, cut to fit premade card. Added heart brads and tied ribbon through them. Added starform stickers for embellishment. Could be used as an all occasion card.
Purple butterfly
Created using purple and flower printed cardstock. Used slice vintage findings design card for butterfly and happy birthday banner. Embellished with starform stickers.
Friday, 18 February 2011
Baby card
Used blue background cardstock then cut lighter blue rectangles rounded off with corner punch to fit various stickers. The card was embellished with line stickers for added appeal. Change colour to suit the new arrival.
25th Anniversary
Heart shape was cut from center of a card then a scalloped heart was cut out of silver cardstock and glued over cutout heart in card. Silver flecked scrapbook paper was placed as part of the insert then the 25 was cut using slice machine and foam tabbed to the liner paper to create 3-D effect. Silver corner stickers were added for embellishment along with happy anniversary sticker.
Happy eighth birthday (girl)
Pink cardstock was used for the background. The second layer is butterfly print paper. The 8 was cut using a slice machine with the background paper. Eight tiny butterflies were glued on with wings lifted slightly. Stickers were placed on each corner for embellishment. Using small print of labeller a message was added to the top.
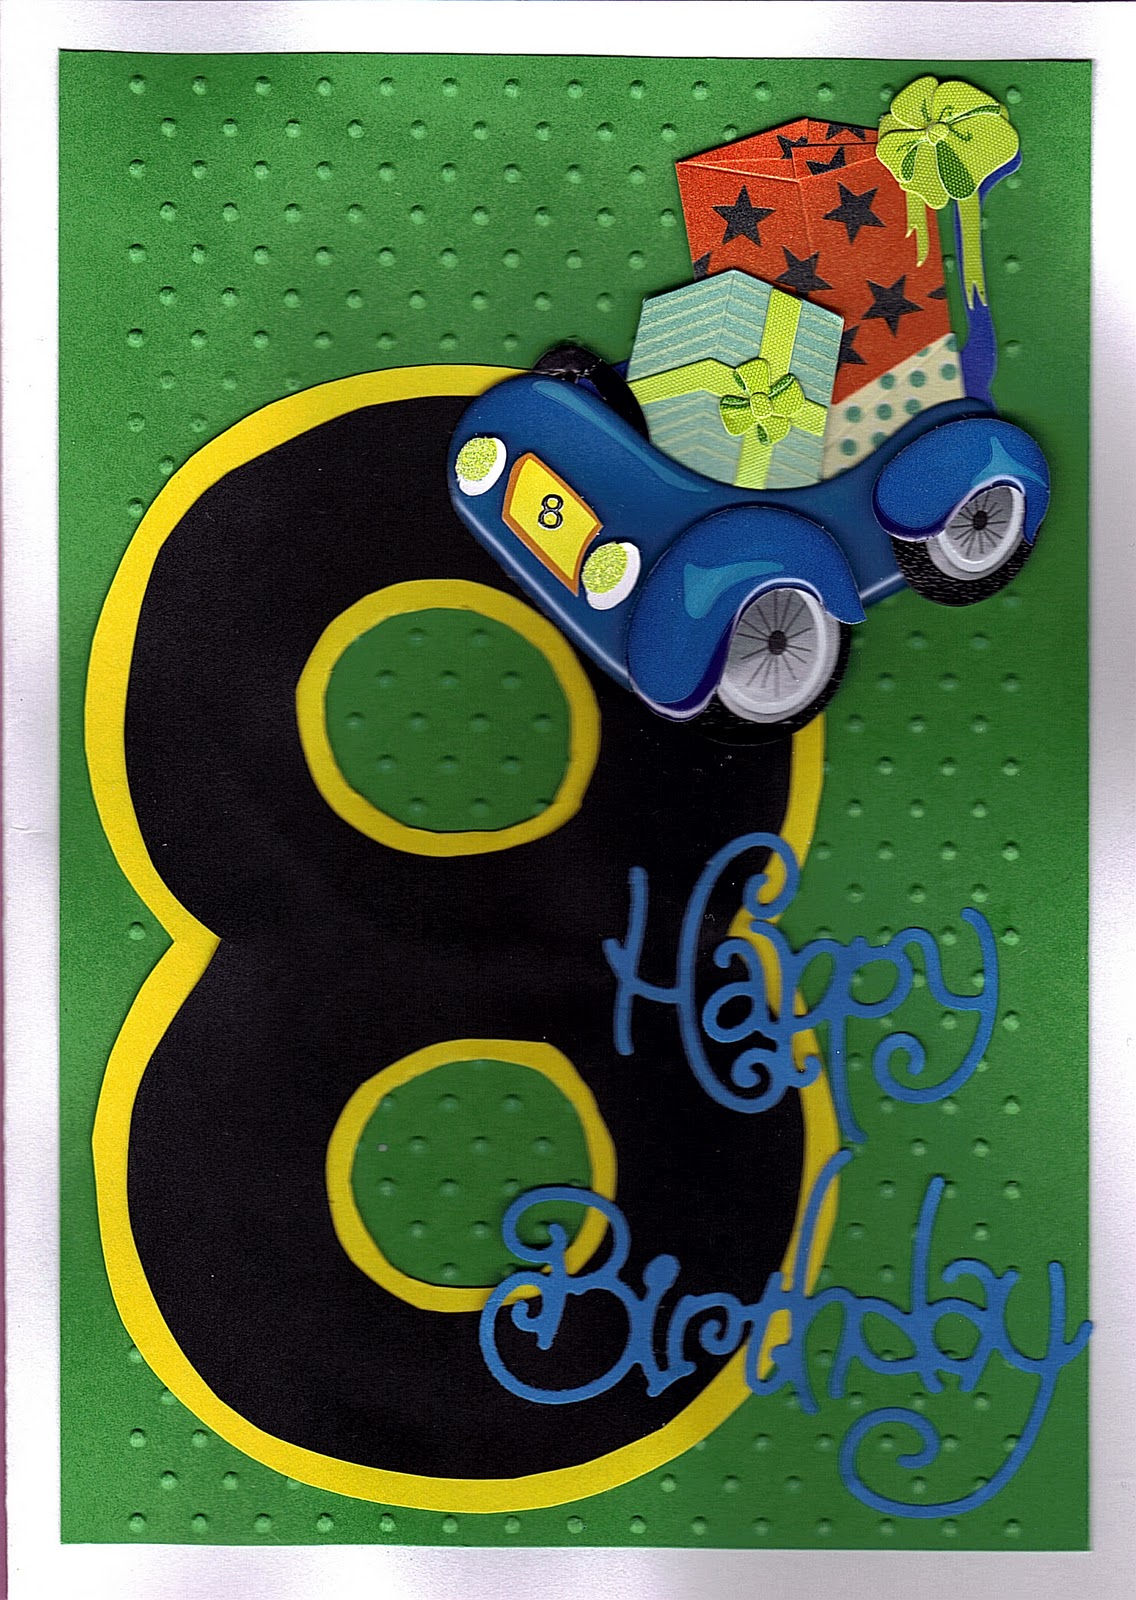
Happy eighth birthday (boy)
Green cardstock was embossed with the polka dot Cuttlebug embossing folder. The eight was cut with the slice machine using the shadow cut and regular cut. Happy birthday was made using a cutting template with the Cuttlebug. The car is a sticker. A small number 8 sticker was also placed on the bumper of the car.
Happy fourth birthday
Created using orange cardstock as background, safari cardstock cut as a strip with 4 lions then the main lion cut out with the number 4. Saying was made with a labeller.
Happy second birthday
Simply made using kitten cut outs, heart stickers, and wavy line stickers. Can be used for a boy or girl.
Thursday, 17 February 2011
Spirelli pink
Created using plain and patterned scrapbook paper, cut on a diagonal to fit card. Spirelli punched cardstock then wound with 1 layer of silver metallic thread. Flower stickers were put on cardstock then cut around. The negative of the sticker was used to create the upper flowers so I didn't have any waste. The spirelli design and the flowers were elevated using a foam tabs for 3-D effect. Stickers were use for remaining embellishments.
Embroidered hearts
Created for my niece using heart Cuttlebug embossing folder and Cuttlebug cutting template for the corners. Heart stickers were embellished with embroidery and stuck on with foam tabs for 3-D effect. I embellished with gold stickers.
Happy third birthday
Child's card using brown cardstock, polka dot paper, and monkeys cut out of safari scrapbooking paper. Words printed with labeller. Number 3 made with the slice machine. As he is learning to count, I made three monkeys and the number 3.
Lace 80th birthday
Created using specialty dollar store paper, lace (pronounced lassay) cutting template, Cuttlebug templates, sizzix templates.
Balloon Card
Card created for father-in-law using Cuttlebug template, Spellbinders template with Cuttlebug and balloon stickers with foam tab under them to create a 3-D effect. Embellished with silver stickers. This card can be used for anyone.
Happy Birthday Card
This is a card I made this week using Spellbinders templates with the Cuttlebug, Stickles glue, an edge punch and 3-D cutout.
Subscribe to:
Posts (Atom)